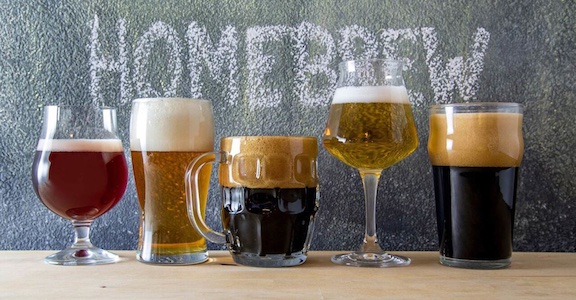
Mashing
Assuming we see getting all the ingredients as step zero, the fun
starts with step one: the mash. So we haven't even
started yet and we can already raise a first point. Where do all
these crazy brewing terms come from? Well, I have no idea but I
always suspected that beer brewers were a little drunk and simply
bastardized common words. Just stand in from of a mirror, pull a
silly face and say the words mash and wort 20 times. Now do it after
a few beers. You'll see what I mean.
The idea behind the mash is to extract sugars from fermentables that
we can later turn into alcohol. For today's homebrewers there are
two and half ways to handle this step. Firstly, we're going to look
at using malt extracts which were created by
someone else. Think of it as outsourcing the first step so we don't
have to start with a lot of equipment. Using extracts, everybody can
make beer on the kitchen stove. Secondly, we'll look at
whole grain mashing which is what beer makers have
been doing for centuries. This process is a little more complex and
requires more equipment.
Extract brewing
As stated above, extract brewing is an entry level technique to
allow as many people as possible to start with the hobby. Two types
of extracts can be purchased from a homebrew store and often they
sell them in kits to include the other ingredients as well. In both
cases someone else has extracted sugars from fermentables and we
just simply add them to water. Dry Malt Extract or DME comes in
powder form and Liquid Malt Extract or LME comes as the name
suggests in liquid form.
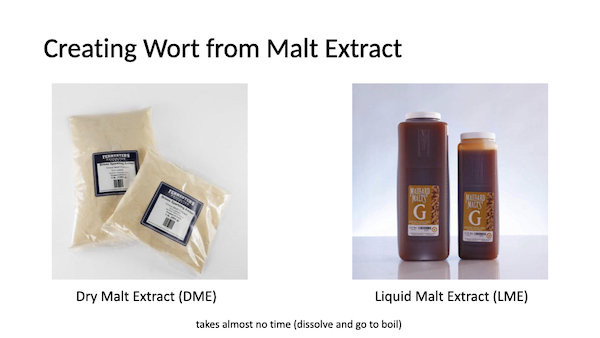
I've used both types and I have a preference for DME since it can be
bought in a very light color and it doesn't have that caramel taste
that I so often had with LME. Please note that others swear by LME
but they may be making a different style of beer. For my Belgian
style Tripels, Witbier and Pale Ales, light DME was better.
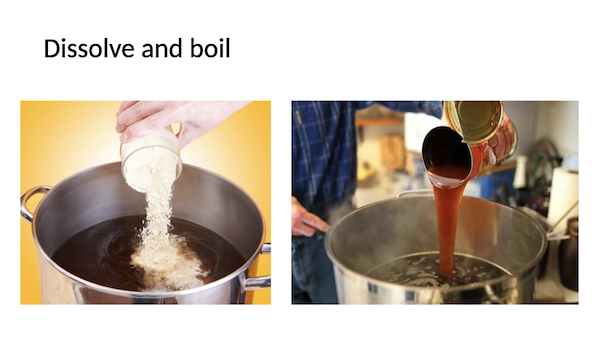
Using an extract massively simplifies the early steps (as we will
see later). In the end, mashing is as simple as dissolving, mixing
and starting the boil.
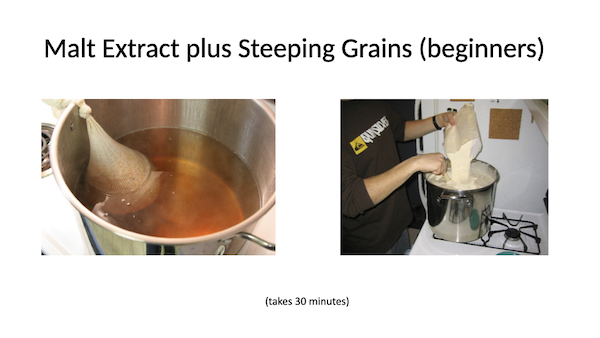
Earlier I stated there were two and a half ways of mashing and I was
referring to a hybrid approach between extract and
whole grain brewing. Often kits have a small amount of
crushed grain that will be steeped in water of a certain temperature
(often around 155F) for 30 minutes or so. You only need a bag for
this and it's basically the same idea as steeping thee. The benefit
of that is that you can add interesting flavors and it gives the
sensation that the beer is more fresh and rich. The entire time I
did extract brewing, I used this style.
So if you are only interested in extract brewing, you can skip the
rest of this section and go straight to the
boiling process. In fact,
if you never brewed before, I recommend you do this as the next part
of this section is probably the most complicating part of beer
making. Once you understand the whole process, come back here and
learn how it's done for real.
Fermentables
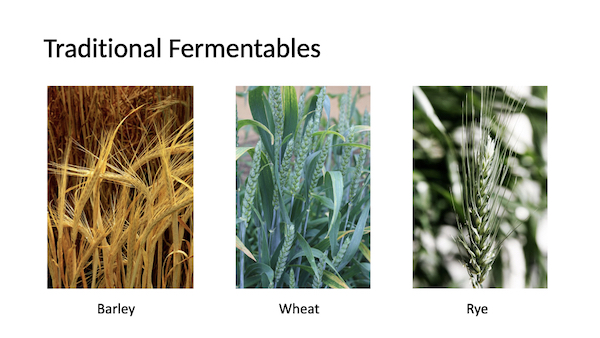
All beer brewing is based on converting sugars into alcohol so let's
have a look at where these sugars come from. Firstly, there are the
traditional fermentables like barley, wheat and rye. Most beers are
made from sugars extracted from these grains.
It is also possible to use other sources for our sugars and these
are typically added to the grains above for flavor (think of fruity
beers like Kriek Lambic) or to make stronger beers (like adding beet
sugar for strong Abbey Ales). It is also possible to make alcoholic
beverages by just using these fermentables. Think of wine or hard
seltzers but these are obviously not
beers.

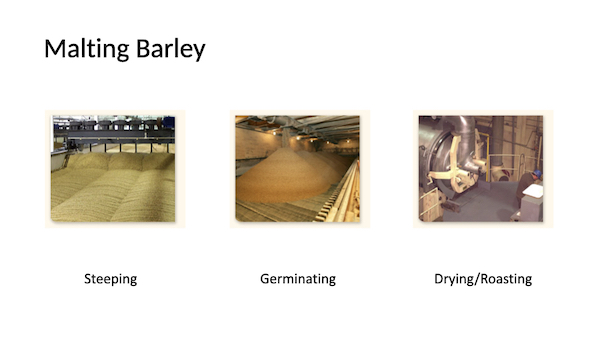
Malting Barley
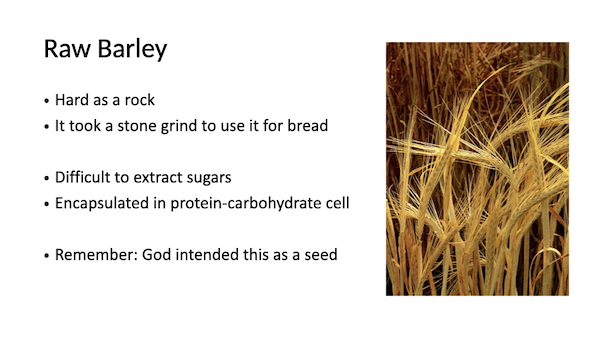
So how do we extract sugars from grain? Well, let's start with
Barley. It turns out that it's not easy to get the sugars released
from it. The slide below sums up our problem.
So to get to the sugars, a three step process called
malting is used. Firstly, the grains are steeped to
soften them up and then a germination process is started to open
them up. Obviously we don't want to grow fields of barley at this
point so we need to stop the process. Through a drying/roasting
process, the germination process is halted and the barley is now
ready for our brewing process.
Since the barley is roasted at the end of the malting process,
different roasting times and temperatures will result in different
products just like with coffee. Malts can therefore be roasted
lightly to dark which results in a different color and flavor.
Lighter beers typically uses malts from a lighter roast and darker
beers like stouts use a darker roast.
The level to which the malt is roasted is measured in
degrees lovibond
which measures the color of the resulting beer. Lighter beers like
lagers have a low number and darker beers like stouts have a higher
number.

Some of you might already be getting scared at this but but don't
fear, the malting process is typically done in large industrial
facilities. As home brewers, we simply buy the malt in the color we
want for our recipes. In fact, I don't know of a single home brewer
that malts his/her own grain even though I assume they exist.
Beer making supply stores typically offer up a wide variety of malts
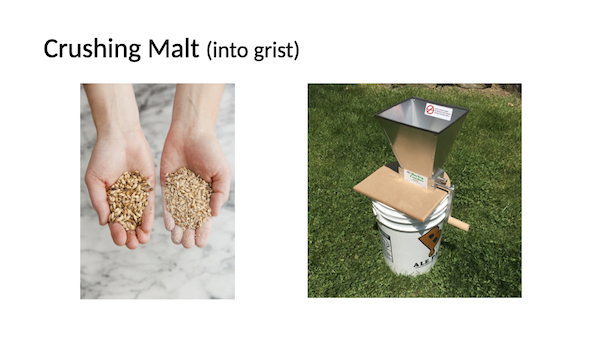
and they typically come whole or crushed. I always buy mine crushed
as I don't own a malt crusher. My local store crushes the malt to my
liking and since I use it immediately, it's just as fresh as when I
would do it myself. Many home brewers however crush their own grain
as they want full control over the process (e.g. determine
coarseness).
Extracting Sugars
Now we're finally ready to extract those sugars from our malt. I'll
first explain the manual way and later explain how we can simplify
and/or automate this process.
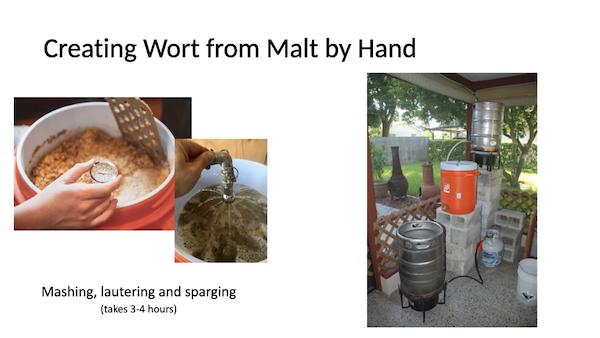
Sugar extraction is the process of creating
sweet wort, which is typically a three step affair:
mashing to extract the sugars,
lautering to filter the wort and
sparging to get the last sugars from the grain.
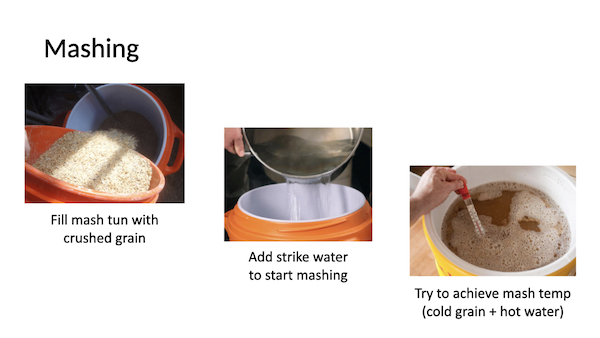
Mashing is where we add warm strike water to the
crushed grain which is typically at room temperature. A little bit
of math is involved here as we want the combination of warm water
and cool grain to end up at the desired mash temperature. Luckily
these days there are great apps and websites that will do these
calculations for us. The temperature of the mash is important is it
determines how the sugars are extracted and what kind of sugars we
want. The science behind this is way beyond a Brewing 101 but at the
bottom of this page is a reference to a book that explains it all.
Warning thougH: there is some serious chemistry and biology involved
here.
Throughout the mashing process (or just at the end), we use the
grain bed to filter the sweet wort which is called
lautering. Lautering is done by circulating liquid
from the bottom of the mash tun to the top either
by hand or with a pump. Mash tuns typically have false bottoms to
support this and the grain bed does a great job at catching the
small particles that resulted from crushing the grain.
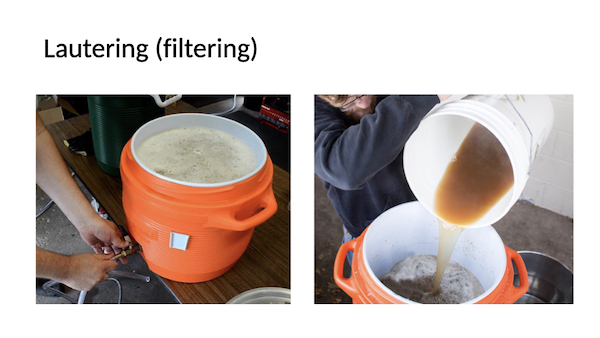
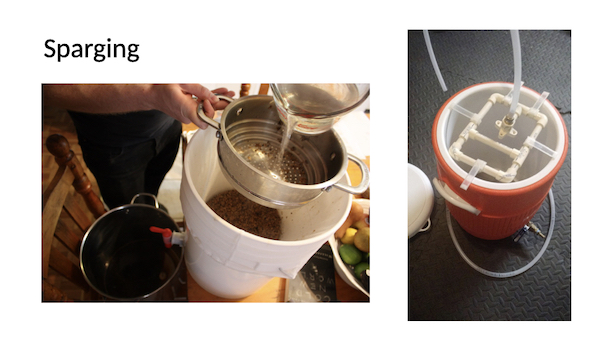
Once the mashing and lautering processes are completed, it is time
to separate the sweet wort from the grain and rinse the grain to
extracted every last bit of sugar. This is called
sparging and people have come up with a lot of ways
to do this. Sparging is typically done with water warmer than the
wort.
As you can see later, if you automate the mashing and lautering
process, there are plenty of people who argue that sparging is not
even required.
So if this wasn't obvious before, beer brewing is a religion and
everybody has their own opinion. I can guarantee you that posting
this simple 101 online will draw fire from the high priests of home
brewing. Don't be discouraged by these types though, you'll soon be
making better beer than they are.
Mashing Equipment
As you figured out, extracting sugars is a complicated process and
home brewer ingenuity has gone crazy over the years on how to do
this on a small scale and within budget. Firstly, there the people
(including me) that used gravity and manual labor to move the wort
through the process. This makes for a long brew day with a lot of
steps and heavy lifting. As a beer drinker, I alway though this was
a good idea as I was burning some of the calories I would consume
later.
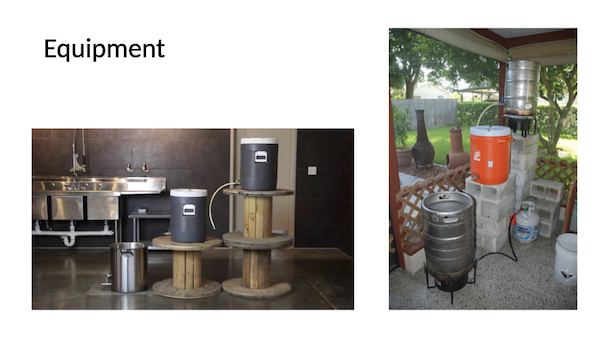
Secondly, there are people who invest a lot of money and create a
mini version of a commercial brewery with stainless steel vessels
and pumps. Both this and the manual/gravity method will work but in
both cases, you have a lot of stuff to clean at the end of your brew
day. Again, this could be a positive as you're burn calories before
you consume them.
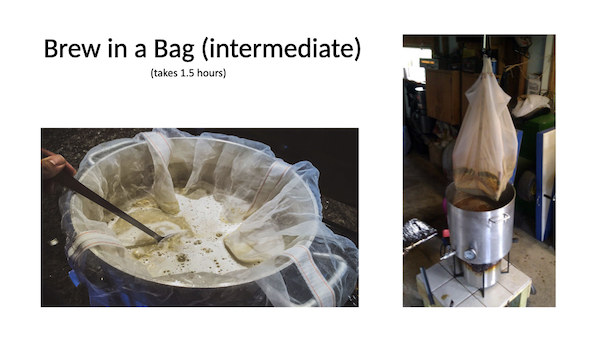
In my case, I took an intermediate step and went from extract
brewing to brew in a bag. With this technique, you
are extracting sugars from your grain in the same vessel that you
use for the boil. The idea is really simple as you steep your grains
in a large brew pot just like steeping thee for the entire city of
London in one go (slight exaggeration).
This step allowed me to move to whole grain brewing without a great
investment (I already had a fancy brew pot for extract brewing) and
I felt like I was moving forward. My only negative was that my sugar
extraction efficiency was poor and my beers weren't measuring up to
the Belgians I was trying to recreate.
Given that "brew in a bag" was not going to get me to make
my favorite Abbey Brews, I did go down the manual/gravity mashing
route described above for a while. Unfortunately my patience and
endurance were not compatible with this approach and my beer quality
became inconsistent and unpredictable. It was time to either go back
to extract brewing (nothing wrong with that as I managed to make
some great beers using this technique) or to find a different way.
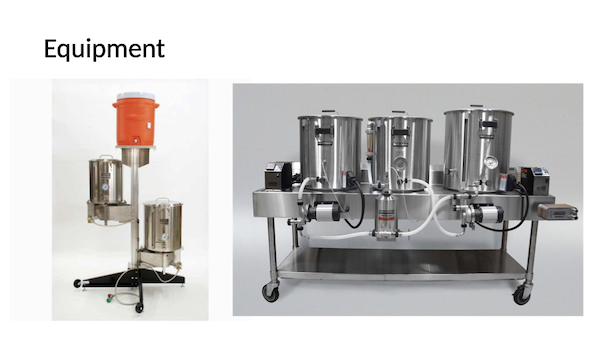
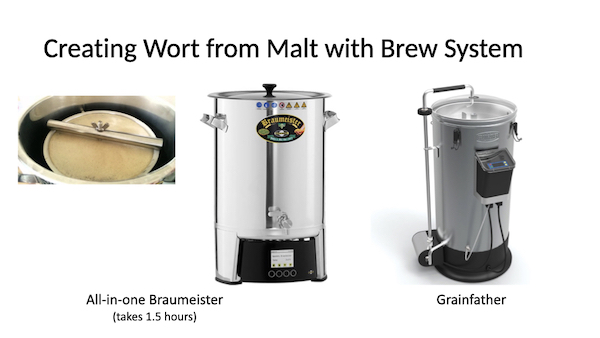
The answer turned out to be an electric all-in-one brewing system
that automates the mashing. lautering and boiling process. This is
also a significant investment but it simplifies the brewing process
and it offers a repeatable process that creates a more consistent
outcome. So I've invested in a Braumeister and never looked back.
Multi-Step Infusion
When you use the manual mashing process, it can be very hard to keep
the temperatures at the right level. This is why I always did single
step infusions where you try to keep the mashing temperature as
constant as possible during the entire mashing process.
Once you move to an all electric system, you can move to a
multi-step infusion process where you use different temperatures to
extract the sugars. This is the process used by commercial beer
brewers as it allows them to extract more and the right kind of
sugars to achieve the effect they are after. If you are interest in
this, the links at the bottom of this page will recommend books and
web site that will explain chemical processes like the acid rest,
protein rest, starch conversion or saccharification and diacetyl
rest. This stuff will make your brain hurt long before you have a
hangover.

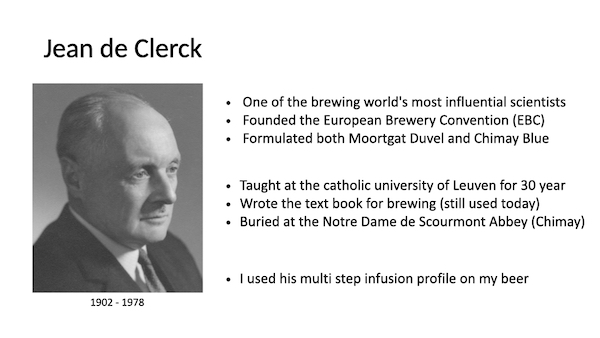
As I'm interested in Belgian Ales, I quickly learned of a man called
Jean de Clerck who was and probably still is one of the most
influential beer brewing scientist. So until I fully understand the
chemistry behind the mashing processes, I've adopted his
mash schedule for a number of my Belgian recipes.
If you made it to this part of this tutorail, you deserve a medal.
The mashing process to extract sugars and create sweet wort, is the
most complicated part of beer brewing. you can see why beginners
start with extract brewing. I must say however that by investing in
electric brewing, I have simplified the process as well and the
automation allows for very consistent products. If I could only
understand all the chemistry behind all of this so I could reason an
outcome rather than rely on trial and error.